With reporting by Jaclyn Walsh

Step 1: First, try things out in your backyard
Consider this a trial run for the big campout—with the house right there, in case there are bathroom issues, fear of the dark, or a sudden thunderstorm.
For kids who’ve never camped before, the onslaught of new experiences— sleeping in a tent, sleeping outdoors, not sleeping in a bed, nighttime critter sounds, a bathroom that is not just a few steps away, to name a few—can be overwhelming. Ease the transition to a real camping trip by pitching a tent in the backyard. This will do two things: get your kiddies used to the feel of sleeping outdoors and also get them excited about how fun the whole thing is, from making s’mores on the backyard grill to lying down and looking at the stars. Get them kid-sized solar lanterns so the darkness doesn’t freak them out, make sure they use the bathroom inside before climbing into their sleeping bags, and if the tent is familysized, so much the better!
Step 2: Find a Family-Friendly Campground
These campsites are all within a few hours’ drive of Denver.
Chatfield State Park
Location: Littleton
Distance from Denver: 22 miles
What the kids will like: The park has places to go horseback riding, hot-air balloon rides, paddleboards, fishing, and a model airplane field.
Amenities: Campsites are paved and close to picnic tables and grills.
To reserve: Chatfield is the most visited park in Colorado, so it’s wise to make reservations in advance. 800.244.5613.
Golden Gate Canyon
Location: Golden
Distance from Denver: 32.6 miles
What the kids will like: The two yurts at Reverend’s Ridge Campground, inspired by the dwellings of Central Asian nomads, feature skylights for stargazing.
Amenities: There are flush toilets, showers, and even laundry facilities at Reverend’s Ridge.
To reserve: There’s a two-night minimum stay in the yurts and in the five cabins at Reverend’s Ridge, both of which require reservations. 800.244.5613.
Horsetooth Reservoir
Location: Fort Collins
Distance from Denver: 67 miles
What the kids will like: Water skiing, swimming, scubadiving, tubing, windsurfing, sailboarding, or fishing (walleye, trout, and bass) on the 6.5-mile-long reservoir— plus sandy beaches on the west side of the lake, surrounded by foothills, for relaxing. Amenities: Boat launch ramp, comfort station, drinking water, dump station, showers
Heaton Bay Campground
Location: Dillon
Distance from Denver: 72 miles
What the kids will like: You can rent a boat at the Dillon Marina for an afternoon of fishing (rainbow and brown trout) or sailing, plus the seven miles of paved trails for hiking and biking.
Amenities: Boat ramp access, picnic tables, campfire rings, vault toilets, drinking water, and bike paths that lead into town for morning coffee runs.
Moraine Park Campground
Location: Rocky Mountain National Park
Distance from Denver: 75 miles
What the kids will like: Popular hiking trails are close to this campsite, and hikers can expect to see lakes, waterfalls, and sweeping views of the Rockies. Camping with older children? Try challenging the family to a summit trail.
Amenities: Each campsite (tents only!) comes with a picnic table, fire ring with grate, and tent pad; many sites have flush toilets and drinking water, too. RMNP’s free shuttle bus stops at the campground to take campers to some park trailheads.
Lone Duck Campground
Location: Cascade
Distance from Denver: 82 miles
What the kids will like: Explore Garden of the Gods Park or the Manitou Cliff Dwellings, both within a 20-minute drive, or take a drive up Pikes Peak.
Amenities: Cabins are equipped with electrical outlets, refrigerators, and microwaves for families not ready to rough it. With a heated pool, a lodge with a game room, and free wifi, this one’s perfect for the family needing to stay connected.
Mueller State Park
Location: Divide
Distance from Denver: 100 miles
What the kids will like: Wildlife roam the 5,000 acres of meadows and conifer forests, including elk, hawks, mule deer, and black bears.
Amenities: Picnic tables, comfort station, showers, laundry facilities, dump station, visitor center with interpretive programs, 34 miles of horse trails
Jellystone Parks
Locations: Larkspur, Estes Park, Montrose
Distance from Denver: Between 36 and 305 miles, depending on location
What the kids will like: They can join Yogi Bear and friends for s’mores around the campfire. Each franchise offers guests their choice of cabin rentals, tent sites, RV sites, yurts, and teepees. Enjoy hiking, hayrides, splash pads, and themed activity weeks. Amenities: Depending on park, showers, restrooms, laundry, general store, ranger station, firewood, propane, pancake breakfast, and more
Piñon Flats Campground
Location: Great Sand Dunes National Park
Distance from Denver: 241 miles
What the kids will like: The family can go hiking or enjoy sand sledding, and kids can pick up a Junior Ranger booklet or join a Junior Ranger program. Early in the summer, pack bathing suits so the kids can splash in Medano Creek.
Amenities: Restrooms with sinks, flush toilets, dishwashing sinks, fire grates, and picnic tables at each campsite
Step 3: Outfit Yourself With These Musts
The last thing you want is to get to your campsite, settle in, and realize you forgot the matches. Or the cooking pot. Or the tent! Use our handy list—compiled with the help of Mifflin Zyff, sales lead of experiences at REI Denver—and check it twice.

Tent: “If you’re camping in the summer, a three-season tent is going to work great,” says Zyff. “I recommend the REI Base Camp, which comes in four-person ($390) and sixperson sizes ($450) and is geared towards car camping with larger groups.”

Sleeping pad: “A sleeping pad raises you off the ground and provides a layer of protection and warmth between your sleeping bag and the earth. One of the most popular pads right now is the Exped MegaMat ($150–$180). It’s thick and extremely comfortable for car camping. They make it in a single style and a duo style so you and your partner can use the same one. You can also use the duo for multiple small children.”
Sleeping bag: “For summer camping, a sleeping bag rated to withstand temperatures down to 30 degrees Fahrenheit will work. If you’re a cold sleeper, try a bag with a mummy shape—broader at the shoulders and tapering down to your feet. The more air you have inside the sleeping bag, the harder it is for your body to heat up the space, so the mummy bags warm up faster. For side sleepers, Nemo makes a line of bags with a ‘spoon’ shape—wide at the shoulders, tapering in at the waist, flaring out at the hips, and tapering back in at the legs. This gives people a little more room to scrunch up.” The Disco Men’s Down Sleeping Bag ($260, pictured) and the Rave Women’s Down Sleeping Bag ($260), both by Nemo, are good options.

Storage system: “You’re going to need some kind of storage system to help separate clothing, food, and gear and keep it organized.” The 24-gallon Rubbermaid Action Packer ($50) is a great storage option to keep in the car. “If you’re going to be around water, then you might want a few dry bags like the Sea to Summit Lightweight Dry Sack ($25 for 20-liter, right). If you’re not around water and you still want to organize your gear into bags as opposed to bins, the REI Ditty Sack ($20 for a set of three: 2-liter, 3-liter, and 7-liter) works great.”

Stove system: “If you don’t want to cook over the fire, you can use a two-burner camp stove instead. The Coleman Triton Series 2-Burner ($80) is a great option. There are two flames, so you can cook eggs on one and boil water on the other, or whatever the case may be. And it’s very portable. It’s about the size of a briefcase, so you can throw it in your trunk and it won’t take up a lot of space.”
Step 4: Add a Few Indulgences
Want to make your campsite feel like home? These fun add-ons, recommended by REI’s Mifflin Zyff, will take your camping trip from good to great.

Hammock and stand: “The tricky thing about hammocks in Colorado is that many campgrounds don’t allow them because the straps can damage tree bark, making the trees susceptible to bark beetles. But if a hammock is something the family really wants to bring along, there are hammock stands to solve the problem. Eno makes one called the Nomad Hammock Stand ($250) that’s very sturdy and folds into a portable bag.”

Comfy camp chair: “I’m a big fan of Nemo’s Stargaze Recliner Luxury Chair ($220). It uses a hammock-type system that rocks back and forth and is extremely comfortable. The back of the chair is high enough to provide neck support.”
Collapsable kitchen sink: “I use the Sea to Summit Kitchen Sink ($30 for 20-liter) because it packs up really small. If you’re thinking about trunk space, you don’t want to pack big, bulky water basins for dishes—they take up too much room.”

Dog hitch: “If you’re bringing the dog, bring a good leash. Most campgrounds in Colorado require dogs to be leashed at all times on nothing longer than a six-foot lead. Rough Wear makes a hitching system called the Knot-a- Hitch ($60) that connects to multiple trees and gives the dog a runner. Dogs stay on their six-foot leashes but can move around the campsite instead of just getting wrapped up around the picnic table or the base of a single tree.”
Step 5: Pack Your Cooler
If you are a former Boy Scout or Girl Scout, you know how important it is to BE PREPARED. That starts with packing the food.

1. Do a menu plan—breakfast, lunch, dinner, and snacks—ahead of time and make ingredient checklists for all of them, including cookware needed. Decant ingredients from larger containers into smaller ones.
2. Make some dishes ahead of time for stress-free reheating on the campfire. Let the kids help by premaking breakfast. Whip together pancake batter and store in recycled condiment containers for easysqueezy flapjacks. Scramble eggs and store in a water bottle to avoid shell-cracking mishaps.
3. Pre-chill your coolers by filling them with ice 12 hours before departure to make the internal temperature as cold as possible. Attach a small thermometer to the interior walls to ensure the temperature inside stays at 40 degrees Fahrenheit. Use one cooler for food, a second one for drinks.
4. Save space in the cooler by freezing items. Frozen water jugs can replace ice cubes and double as drinking water as they thaw. Little campers can help you load juice boxes and hot dogs into the freezer the night before the trip.
5. Pack in layers, with the top items the food you will use first, and the bottom layer reserved for your last camp meals.
Step 6: Pack Your Car
Don’t toss things willy-nilly into the back of your car, no matter how roomy the trunk. Follow these steps instead.

1. First, sort your camping gear into bins/bags for different parts of the campsite (the kiddos can help). Have them for kitchen supplies, sleeping gear (blankets, pillows, sleeping bags), fun items (fishing poles, etc.), and a firstaid kit with prescription lists and doctor numbers, etc. Clearly mark the bins on the tops and sides with a Sharpie.
2. Avoid playing Tetris by laying out everything you want to take—and we mean everything—on the ground near the trunk of your empty car.
3. Work chronologically. Place the items you need last on the bottom and those you need immediately on top or by the door. Arriving at dinnertime? Make sure the coolers and camp stove are easily accessible. Arriving after dark? Make sure you know where your lighting is (and can quickly grab it).
4. Go heavy to light. Pack items that have flat surfaces and are heavy (camp coolers, camp stoves, etc.) on the bottom, where they can’t slide around. Slide long items (fishing poles, camp chairs, tents) on the sides. Fill in gaps with soft sleeping bags, blankets and pads, and soft-sided bags (with zippers visible so you can get inside easily).
5. Finally, snap a photo of your packing configuration before you take off into the wilderness. You’ll have a much easier time packing for the return trip if you have a picture to reference.
6. For the passenger seats, pack screen-free entertainment for the kids. Give each child a container filled with games and books that can double as a back-seat lap desk. Keep the whole family engaged on the drive with games like “Dr. Biscuit’s Radical Road Trip Travel Game.” Add a couple of pillows for the kids, a small bag of snacks for the drive—and don’t forget to have campsite maps (and an extra set of car keys) up in front with you!
Step 7: Set Up Your Campsite
It’s going to be your home away from home for the next couple of nights. Do it right.

Find a site. Heather Balogh Rochfort of justacoloradogal.com recommends looking for one that has been previously used, ideally on flat ground, and protecting aquatic wildlife by setting up at least 200 feet away from water. Orient your tent relative to the sun—facing east for the sunrise. Last, avoid sleeping under trees with dead branches or in natural depressions. You don’t want to wake up to branches falling or an overnight flood.
Set up a “sink.” Keep campers clean by setting up a hand and foot washing station. Fill a recycled laundry detergent container with water and let the spout hang over the edge of a picnic table. Place a bucket under the spout to rinse feet.
Prevent tripping. Cover tent cables with last summer’s old pool noodle. Cut the noodle into four pieces and thread the cables through to mark pole lines.
Bunk it. Score points with the kids by incorporating bunkbeds into the trip. Elevate the sleeping arrangements with a double camping cot that saves space in the tent. Check out Disc-O-Bed for a model that can be pulled apart into separate cots as well.
Hang things up. Bring hanging clothes organizers for easy outfit storage. Hang the organizers inside the tent so kids can easily pull out clothes each day without rummaging through bins for socks and t-shirts.
Rope things off. Create campsite boundaries with brightly colored jump rope. Use the rope to mark off areas to help tiny campers understand where not to cross the line.
Soften your sleeping space by lining the floor of your tent with foam tiles. Pack up the puzzle-piece interlocking tiles from your kid’s playroom at home for a quick solution that will have your knees thanking you.
Add soft lighting. If your kids are afraid of the dark, hang battery-powered clip-on LED light bulbs to the inside of the tent to serve as nightlights.
Teach “Leave No Trace.” Teach kids the importance of leaving the campsite as you found it by designating an area for trash. Keep critters from rummaging through garbage with a zipper-locking pop-up trash can.
Step 8: Eat!
Our best advice: Keep it simple. Prepare as much as you can at home. And always have backups. Here are four camp-friendly recipes, courtesy of Steuben’s Nick Kayser.

Skillet Pizza
INGREDIENTS
1 package of 10-inch pitas
1 quart tomato sauce
8 oz. shredded mozzarella
Your choice of meat and veggies
DIRECTIONS
Oil the skillet. Layer your ingredients on top of the pita starting with sauce, then cheese, then toppings. Cook over stove or fire until cheese is melted through.
Mac ‘N’ Cheese
INGREDIENTS
4 oz. butter
2 oz. flour
2 c. milk
2 oz. Cheddar cheese
4 oz. American cheese
3 oz. Swiss cheese
3 oz. Provolone cheese
1 oz. Brie
1 oz. fontina
1 pinch of salt
1 lb. elbow noodles
DIRECTIONS
In a large sauce pot, melt the butter until liquid and simmering. Add the flour to the mixture, and turn heat down to a low simmer. Keep stirring. When the roux turns tan, add the milk. Bring the mixture to a simmer, hen add the cheeses slowly. Keep stirring on low heat until the cheese is fully incorporated into the sauce and not separated. Remove from heat and cool in a receptacle
Cucumber Salad
INGREDIENTS
2 cucumbers, sliced on mandolin to 1/6 inch
1/2 red onion, thinly sliced
2 Tbsp. sugar
4 Tbsp. olive oil
3 1/2 Tbsp. red wine vinegar
1/2 c. water
2 tsp. salt
1 tsp. black pepper, ground
DIRECTIONS
Gently toss together the cucumbers and red onions. Whisk together remaining ingredients and pour over cucumber mixture. Place in container that lets liquid cover mixture. At campsite, add to top of cooked hash.
Greek Hash
INGREDIENTS
1 lb. diced russet potatoes
8 oz. lamb gyro meat
1 small red onion, sliced
4 oz. Feta cheese
Bunch of parsley
Sunny-side-up eggs
DIRECTIONS
Get an oiled cast-iron skillet smoking hot with oil and add in the raw diced potatoes. When you have a nice sear on one side of the potatoes, add in the gyro meat and onions. When the meat is finished, remove from heat and pack in a foil wrap for the mountains. Heat up over the cookstove or campfire; top with Feta and (optional) parsley.
Step 9: Make it Fun!
Over the hills we go! Tips for hiking with the kids.

What to bring: Carry a pack with sunscreen, snacks, water, bug spray, wet wipes, and a first aid kit. Get your hikers involved in the planning process with a snack-making activity. Ask kids to build their own trail mix from assorted nuts, dried fruit, granola, and chocolate.
A chance of showers: It’s no secret that Colorado weather can be unpredictable. Plan for sudden showers by packing a hooded rain jacket and extra socks to keep little feet dry after sloshing over muddy trails.
Choose the right trail: Pick a trail with little elevation gain and features like waterfalls or lakes to give your hiking buddies something to look forward to. Consider the distance and difficulty of the trail. Avoid crowds and beat the heat by starting early.
I spy…Plan games to entertain your little explorers. Keep them engaged with classics like “I Spy” or incorporate a scavenger hunt. Prepare a check-off sheet with things you’ll see along the trail, like birds, insects, flowers, and fungi. Hiking with a techlover? Upgrade to a digital treasure hunt with Geocaching.
Take breaks: Give your hikers a chance to rest and refuel with plenty of stops. Make sure they drink enough water and reapply sunscreen as needed. Do the kids tend to outrun you? Slow down the pace by disguising breaks as photo opportunities. Catch your breath while asking your group to say “cheese.”
Hug a tree: Teach children to stay in one spot if they become lost and “hug a tree.” Give each hiker a whistle to carry with instructions to blow three times if they become separated from you.
And remember…Don’t get discouraged if your hike doesn’t go according to plan. Accidents happen and sometimes you need to turn around and call it a day. Hiking takes practice—even for us adults! Be patient and remember: It’s about the journey, not the destination.
Step 10: Know How to Avoid Disasters
Can your camping trip be saved? We asked Joe Brewer, general manager of Feral Mountain Co., for some advice on some of the most common ‘uh-oh’ scenarios.

The camp neighbors seemed quiet when you arrived at noon. By evening, they’d polished off a few bottles of whiskey, and it’s getting wild over there.
This one may be your own fault. The fraternity sweatshirts and trucker hats should have been a dead giveaway. You can politely ask your neighbors to cool it, but that probably won’t work. If the booze is truly flowing, any silence that follows such a request will probably last about five minutes. Instead, wait out the night and switch sites in the morning, advises Brewer. If the campground is full, you can always search for backup options on Hipcamp—a service that works like Airbnb for camp spots.
You just got to camp, and your neighbors say they saw a bear ambling around earlier…
You may think established campgrounds are safe from dangerous wildlife, but the truth is, if you’re sleeping in the open, “those animals are always there, whether or not you know it,” says Brewer. Best advice is to double down on your safe food storage practices. Never keep “smellables” (like toothpaste) in your tent and lock all food in bear boxes.
You forgot something hugely important—like the tent poles or your camp stove—at home.
“I’m an optimist,” says Brewer. “I say, try to rough it out.” Obviously, if you’re a diabetic and you left your insulin at home…yeah, the trip is over. If it’s something slightly less crucial, “you’re probably either going to have to find it locally or borrow it from another camper,” says Brewer. Or improvise. It adds a little challenge to the weekend. Ever wondered if you could fashion a pair of swim trunks out of a tent bag and some duct tape? Here’s your chance.
The new cooler you bought for the trip doesn’t hold ice.
“As long as you’re not out there for too long, you should be fine eating slightly warmer food and drinking warm beer,” says Brewer. “It’s not ideal, but that’s part of the appeal of camping—you’re escaping the comforts of home for something more rugged.” Make sure you have a backup cache of food that doesn’t need refrigeration, like peanut butter and jelly sandwich ingredients, or a big bag of trail mix.
The tent sprang a major leak, and it just started to drizzle.
“This is probably going to happen at night while you’re sleeping,” says Brewer. Always keep a headlamp or flashlight in your tent to deal with nighttime emergencies. “Get anything valuable (electronics, medicines) loaded into the car and move your tent under a tree, if possible.” Sleep in the car if you have to, and figure out what to do the next day. “This may require getting your tent repaired or buying a new one,” says Brewer.
Your kid scrambled up a tree and fell. His leg looks broken.
The trip is over. Head to the hospital.
Camping Gear: Buy vs. Rent
Which is better? We asked REI’s expert, Mifflin Zyff.
The sharing economy has started to influence a whole generation of campers, who are now much more likely to rent gear than to buy it outright. When does it make sense to do one versus the other? We turned to Zyff for answers.
Does it ever make sense to rent camping gear?
“Renting is a great option, especially for people just trying to get into camping. If you’re new to it and you’re not quite sure if you’ll like it, you don’t want to make the plunge into purchasing bigger items right away. A good tent is not cheap. Neither is a sleeping bag. Renting does make a lot of sense for firsttimers or people who have camped once or twice and are still are on the fence about it.”
What kind of gear is best to rent?
“I honestly wouldn’t frown upon renting just about anything. Easiest are tents, sleeping bags, and sleeping pads, but you could go as far as renting backpacks and other things. REI rents out trekking poles, camp chairs, tents that range from two-person all the way up to six-person. You can probably get away with renting just about anything in the camping world.”
When does it make sense to buy?
“If you’ve started camping more frequently, I would suggest looking into purchasing, because at some point there’s a financial benefit that flips. If you’re constantly renting, you’re going to end up spending more money over time than if you simply buy the product. If you’re planning on camping even once or twice a year for years to come, it might make sense to buy, because all of the equipment is going to last a long time, provided you take proper care of it.”
Name That Plant!
Keep children engaged by showing them how to identify some common edible and poisonous plants around you.
Cattails

Edible! Look for these water-loving plants at the base of shallow water. Every part of this plant is safe for consumption—you can even make bread from grinding the roots into flour
Wild Rose Hips

Edible! A common ingredient found in tea and wine, rose hips are the fruit of the wild rose plant. These tasty bulbs contain more vitamin C than oranges.
Wax Currant

Edible! The pink and white bell-shaped flowers bloom April–July. A favorite snack among birds, the fruit (currant) can be used in jam and baked goods.
Horsemint

Edible! Used by Native Americans to relieve colds and nausea, this aromatic herb is a member of the mint family and can easily be identified by its spiky purple flower.
Columbine

Do not touch! The purple and white flowers may taste sweet, but the roots and seeds are highly toxic. Look for these elegant flowers in shaded, moist locations in June–August.
Death Camas


Do not touch! As if the name weren’t scary enough, this deceptively innocent- looking plant has a highly poisonous toxin dangerous to unsuspecting humans and animals
Red Baneberry

Do not touch! The bright, juicy appearance of these berries may tempt your taste buds, but beware—this plant is poisonous. Eating the fruit could have unpleasant consequences.
Poison ivy, Oak & Sumac

Do not touch! Leaves of three, let them be! These plants produce an oil called urushiol which can trigger an itchy form of contact dermatitis, resulting in rashes or blisters.
Time to Explore!
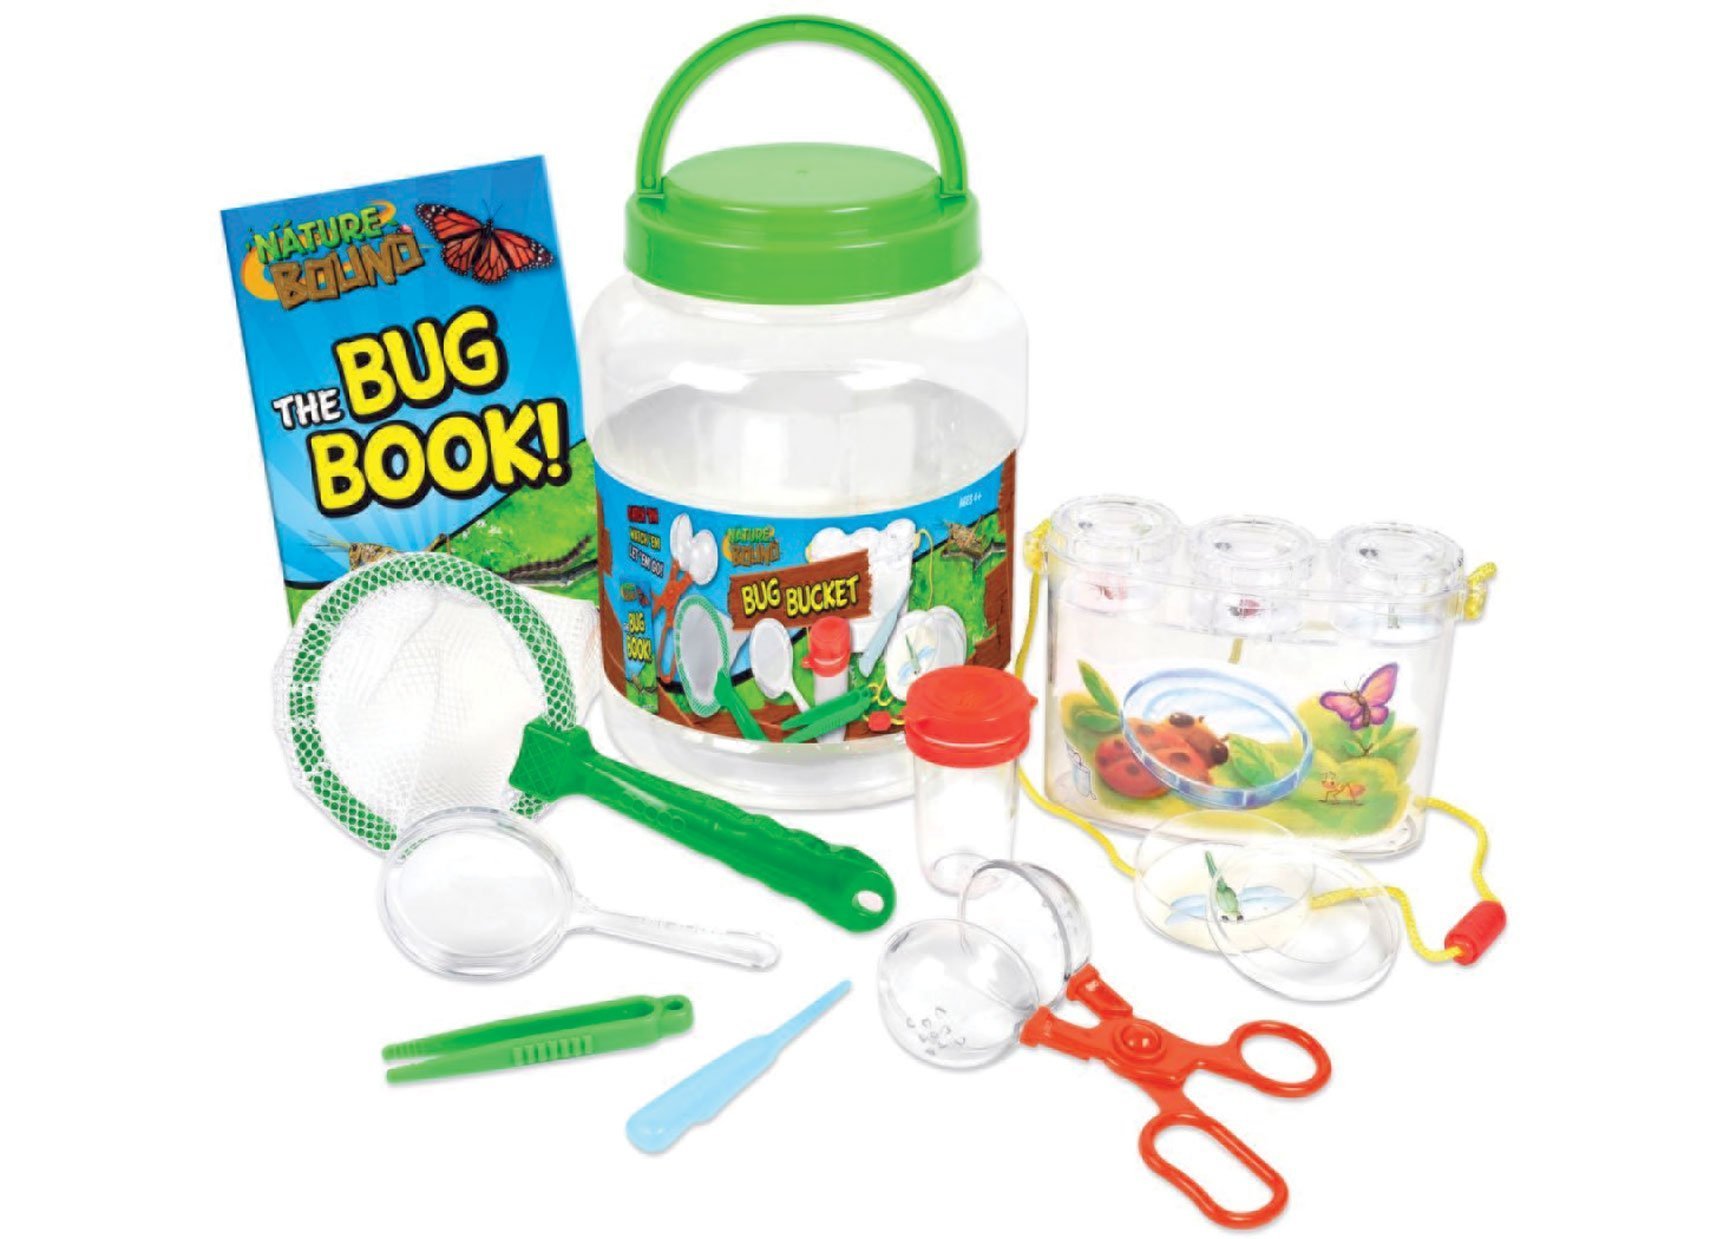
Catch little critters with the Nature Bound Bug Catcher Kit
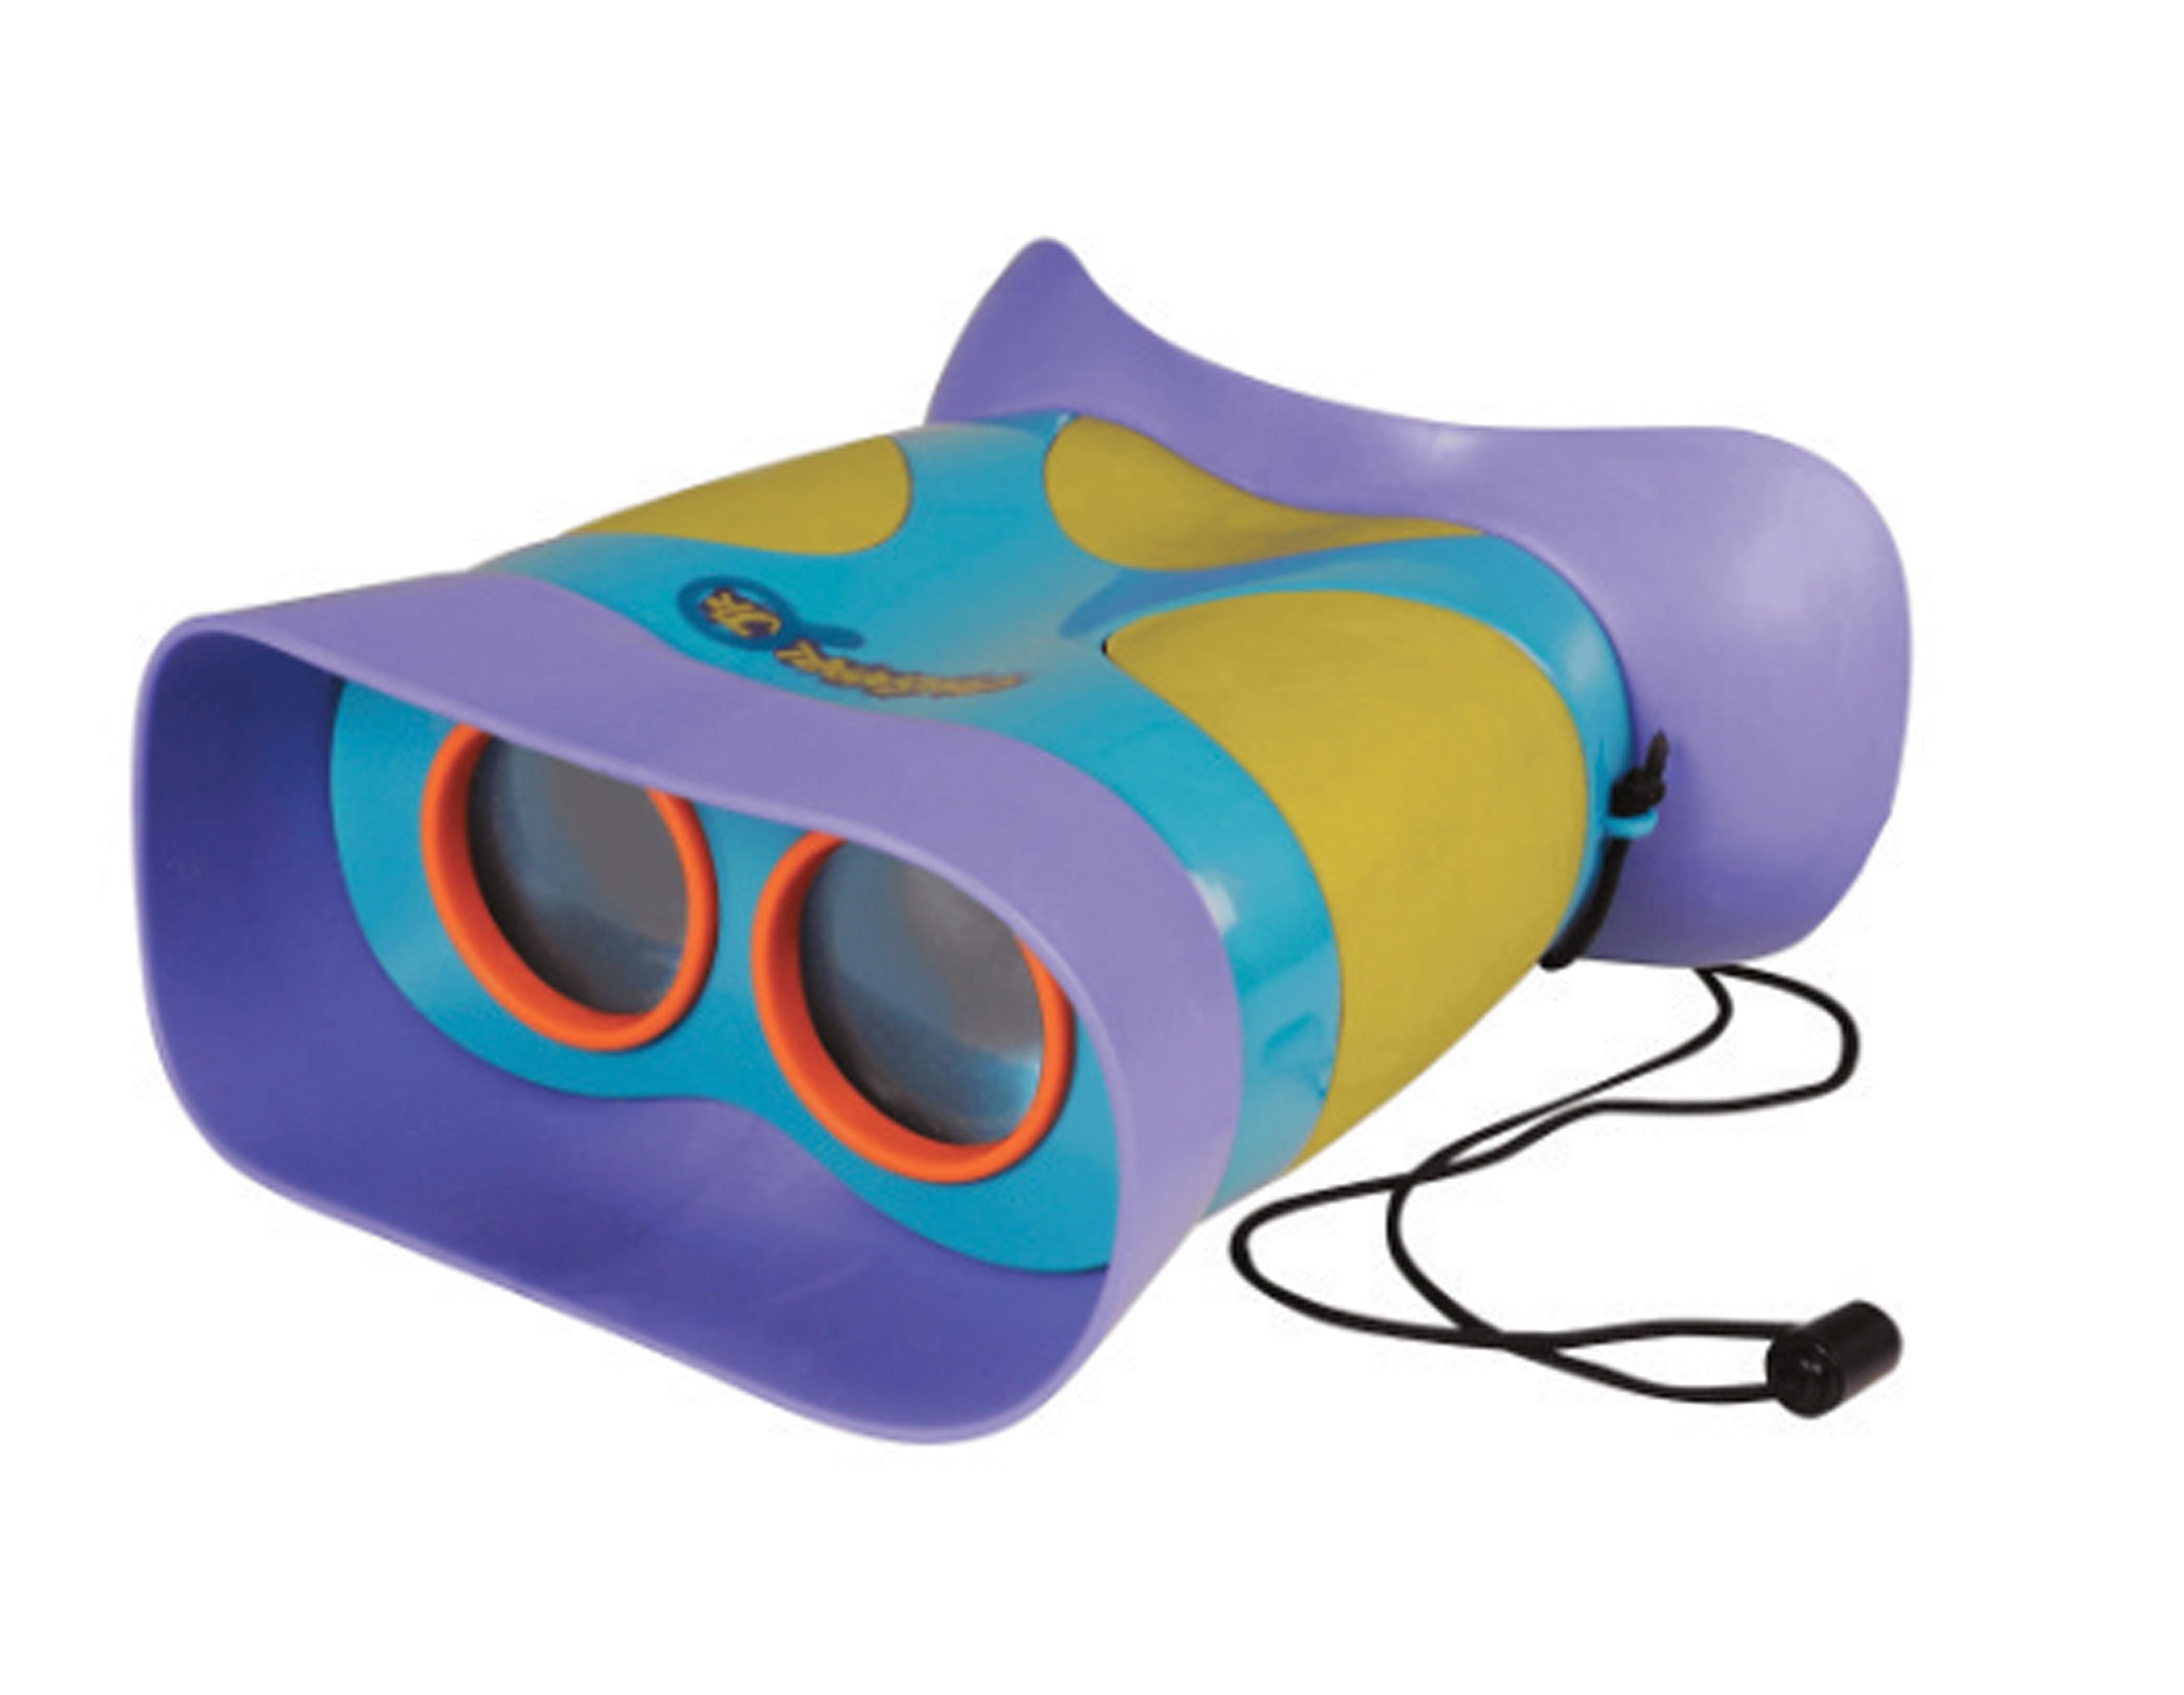
Have your kids look for birds with Educational Insights Geosafari Jr. Kidnoculars
Rainy day? Play cards in the tent with the Uno Wilderness Deck

Play wilderness spy games with Diliss Walkie Talkies

How to Find and Reserve a Campsite
Follow these tips from Heather Balogh Rochfort of the adventure and outdoor blog Just a Colorado Gal
Don’t delay: “Make a reservation earlier than you think you need,” says Rochfort. “Campgrounds close to the Front Range get bombarded with people, so reserve a location at least three months in advance. Locations in the high country will fill up even faster.”
Go public: The National Park Service accepts reservations up to six months in advance during peak season for some locations. For campground reservations, try recreation.gov, reserveamerica.com, or cpw.state.co.us
Go private: Not finding availability in high-demand campgrounds? Try booking a site on private land. Apps like Hipcamp and Tentrr connect campers to hosts willing to rent their land.
Go off the grid: “I also recommend dispersed camping,” says Rochfort. “These free, rustic campsites are outside of established campgrounds but are legally allowed in Forest Service territories. You won’t find them on a map, but if you follow motorized vehicle maps you can find makeshift campfire rings. The sites take some work to get into shape, but kids love to help.”


